Thursday, December 19, 2019
Wednesday, December 18, 2019
Spring BOOT Annotations and Working Demo
Spring is a popular Java application framework for creating enterprise applications. Spring Boot is the next step in evolution of Spring framework. It helps create stand-alone, production-grade Spring based applications with minimal effort. It does not use XML configurations anymore and implements the convention over configuration principle.
Annotation is a form of metadata which provides data about a program that is not part of the program itself. Annotations do not have direct effect on the operation of the code they annotate.
Spring Boot basic annotations
In the example application, we have these Spring Boot annotations:
- @Bean - indicates that a method produces a bean to be managed by Spring.
- @Service - indicates that an annotated class is a service class.
- @Repository - indicates that an annotated class is a repository, which is an abstraction of data access and storage.
- @Configuration - indicates that a class is a configuration class that may contain bean definitions.
- @Controller - marks the class as web controller, capable of handling the requests.
- @RequestMapping - maps HTTP request with a path to a controller method.
- @Autowired - marks a constructor, field, or setter method to be autowired by Spring dependency injection.
- @SpringBootApplication - enables Spring Boot autoconfiguration and component scanning.
@Component is a generic stereotype for a Spring managed component. It turns the class into a Spring bean at the auto-scan time. Classes decorated with this annotation are considered as candidates for auto-detection when using annotation-based configuration and classpath scanning. @Repository, @Service, and @Controller are specializations of @Component for more specific use cases.
There are also Hibernate
@Entity, @Table, @Id, and @GeneratedValue annotations in the example.Spring Boot basic annotations example
The following application is a Spring Boot application which returns data from an H2 database using Spring Data JPA. The application uses FreeMarker as a template engine.
pom.xml
src
├───main
│   ├───java
│   │   └───com
│   │       └───zetcode
│   │           │   Application.java
│   │           ├───controller
│   │           │       MyController.java
│   │           ├───model
│   │           │       City.java
│   │           ├───repository
│   │           │       CityRepository.java
│   │           └───service
│   │                   CityService.java
│   │                   ICityService.java
│   └───resources
│       │   application.yaml
│       │   import.sql
│       ├───static
│       │   └───css
│       │           style.css
│       └───templates
│               index.ftl
│               showCities.ftl
└───test
    └───java
This is the project structure.
pom.xml
<?xml version="1.0" encoding="UTF-8"?>
<project xmlns="http://maven.apache.org/POM/4.0.0"
         xmlns:xsi="http://www.w3.org/2001/XMLSchema-instance"
         xsi:schemaLocation="http://maven.apache.org/POM/4.0.0
         http://maven.apache.org/xsd/maven-4.0.0.xsd">
    <modelVersion>4.0.0</modelVersion>

    <groupId>swam.com</groupId>
    <artifactId>springbootbasicannotations</artifactId>
    <version>1.0-SNAPSHOT</version>
    <packaging>jar</packaging>

    <properties>
        <project.build.sourceEncoding>UTF-8</project.build.sourceEncoding>
        <maven.compiler.source>11</maven.compiler.source>
        <maven.compiler.target>11</maven.compiler.target>
    </properties>

    <parent>
        <groupId>org.springframework.boot</groupId>
        <artifactId>spring-boot-starter-parent</artifactId>
        <version>2.1.1.RELEASE</version>
    </parent>

    <dependencies>

        <dependency>
            <groupId>org.springframework.boot</groupId>
            <artifactId>spring-boot-starter-web</artifactId>
        </dependency>

        <dependency>
            <groupId>org.springframework.boot</groupId>
            <artifactId>spring-boot-starter-freemarker</artifactId>
        </dependency>

        <dependency>
            <groupId>org.springframework.boot</groupId>
            <artifactId>spring-boot-starter-data-jpa</artifactId>
        </dependency>

        <dependency>
            <groupId>com.h2database</groupId>
            <artifactId>h2</artifactId>
            <scope>runtime</scope>
        </dependency>

    </dependencies>

    <build>
        <plugins>
            <plugin>
                <groupId>org.springframework.boot</groupId>
                <artifactId>spring-boot-maven-plugin</artifactId>
            </plugin>
        </plugins>
    </build>

</project>
This is the Maven build file. It contains dependencies for Freemaker, Spring Data JPA, and H2 database. When Spring Boot finds Freemaker and H2 in the
pom.xml, it automatically configures them. We can use them right away.
resources/application.yml
server:
  servlet:
    context-path: /myapp

spring:
  main:
    banner-mode: "off"
datasource:
    platform: h2

logging:
  level:
    org:
      springframework: ERROR
In the
application.yml file we write various configuration settings of a Spring Boot application.
com/zetcode/model/City.java
package swam.com.model;

import java.util.Objects;
import javax.persistence.Entity;
import javax.persistence.GeneratedValue;
import javax.persistence.GenerationType;
import javax.persistence.Id;
import javax.persistence.Table;

@Entity
@Table(name = "cities")
public class City {

    @Id
    @GeneratedValue(strategy = GenerationType.IDENTITY)
    private Long id;

    private String name;
    private int population;

    public City() {
    }

    public City(String name, int population) {
        this.name = name;
        this.population = population;
    }

    public Long getId() {
        return id;
    }

    public void setId(Long id) {
        this.id = id;
    }

    public String getName() {
        return name;
    }

    public void setName(String name) {
        this.name = name;
    }

    public int getPopulation() {
        return population;
    }

    public void setPopulation(int population) {
        this.population = population;
    }

    @Override
    public int hashCode() {
        int hash = 7;
        hash = 79 * hash + Objects.hashCode(this.id);
        hash = 79 * hash + Objects.hashCode(this.name);
        hash = 79 * hash + this.population;
        return hash;
    }

    @Override
    public boolean equals(Object obj) {
        if (this == obj) {
            return true;
        }
        if (obj == null) {
            return false;
        }
        if (getClass() != obj.getClass()) {
            return false;
        }
        final City other = (City) obj;
        if (this.population != other.population) {
            return false;
        }
        if (!Objects.equals(this.name, other.name)) {
            return false;
        }
        return Objects.equals(this.id, other.id);
    }

    @Override
    public String toString() {

        var builder = new StringBuilder();
        builder.append("City{id=").append(id).append(", name=")
                .append(name).append(", population=")
                .append(population).append("}");

        return builder.toString();
    }
}
This is the
City entity. Each entity must have at least two annotations defined: @Entity and @Id. The @Entity annotation specifies that the class is an entity and is mapped to a database table. The @Table annotation specifies the name of the database table to be used for mapping. The @Id annotation specifies the primary key of an entity and the @GeneratedValue provides for the specification of generation strategies for the values of primary keys.
resources/import.sql
INSERT INTO cities(name, population) VALUES('Bratislava', 432000);
INSERT INTO cities(name, population) VALUES('Budapest', 1759000);
INSERT INTO cities(name, population) VALUES('Prague', 1280000);
INSERT INTO cities(name, population) VALUES('Warsaw', 1748000);
INSERT INTO cities(name, population) VALUES('Los Angeles', 3971000);
INSERT INTO cities(name, population) VALUES('New York', 8550000);
INSERT INTO cities(name, population) VALUES('Edinburgh', 464000);
INSERT INTO cities(name, population) VALUES('Berlin', 3671000);
The schema is automatically created by Hibernate; later, the
import.sql file is executed to fill the table with data.
com/zetcode/repository/CityRepository.java
package swam.com.repository;

import swam.com.model.City;
import org.springframework.data.repository.CrudRepository;
import org.springframework.stereotype.Repository;

@Repository
public interface CityRepository extends CrudRepository<City, Long> {

}
The
@Repository annotation is used to define a repository.
com/zetcode/service/ICityService.java
package swam.com.service;

import swam.com.model.City;
import java.util.List;

public interface ICityService {

    List<City> findAll();
}
ICityService provides a contract method to get all cities.
swam/com/service/CityService.java
package swam.com.service;

import swam.com.model.City;
import swam.com.repository.CityRepository;
import java.util.List;
import org.springframework.beans.factory.annotation.Autowired;
import org.springframework.stereotype.Service;

@Service
public class CityService implements ICityService {

    @Autowired
    private CityRepository cityRepository;

    @Override
    public List<City> findAll() {

        return (List<City>) cityRepository.findAll();

    }
}
The
@Service annotation declares CityService to be a service class; a class that provides business services. The @Autowired annotation marks cityRepository field to be injected with CityRepository.
swam/com/controller/MyController.java
package swam.com.controller;

import swam.com.service.ICityService;
import org.springframework.beans.factory.annotation.Autowired;
import org.springframework.stereotype.Controller;
import org.springframework.ui.Model;
import org.springframework.web.bind.annotation.RequestMapping;
import org.springframework.web.servlet.ModelAndView;

import java.util.HashMap;
import java.util.Map;

@Controller
public class MyController {

    @Autowired
    private ICityService cityService;

    @RequestMapping("/")
    public String index(Model model) {

        return "index";
    }

    @RequestMapping("/cities")
    public ModelAndView showCities() {

        var cities = cityService.findAll();

        Map<String, Object> params = new HashMap<>();
        params.put("cities", cities);

        return new ModelAndView("showCities", params);
    }
}
The
@Controller annotation marks a class as a web controller. The @RequestMapping maps HTTP request with a path to a controller method. In the second case, it maps the /cities URL to the showCities() method.
resources/templates/index.ftl
<!DOCTYPE html>
<html>
    <head>
        <title>Home page</title>
        <meta charset="UTF-8">
        <meta name="viewport" content="width=device-width, initial-scale=1.0">
    </head>
    <body>
        <a href="cities">Show cities</a>
    </body>
</html>
This is the
index.ftl template file. It contains a link to create a request to show all cities.
resources/templates/showCities.ftl
<!DOCTYPE html>
<html>
    <head>
        <title>Cities</title>
        <meta charset="UTF-8">
        <meta name="viewport" content="width=device-width, initial-scale=1.0">
        <link rel="stylesheet" href="css/style.css">
    </head>
    <body>
        <h2>List of cities</h2>

        <table>
            <tr>
                <th>Id</th>
                <th>Name</th>
                <th>Population</th>
            </tr>

            <#list cities as city>
                <tr>
                    <td>${city.id}</td>
                    <td>${city.name}</td>
                    <td>${city.population}</td>
                </tr>
            </#list>
        </table>
    </body>
</html>
This is the
showCities.ftl template file. It uses FreeMarker #list macro to display all city objects.
resources/static/css/style.css
h2 {color: blue}

td:nth-child(3) {
    text-align: right;
}
This is the
style.css template file.
com/zetcode/Application.java
package swam.com;

import org.springframework.boot.SpringApplication;
import org.springframework.boot.autoconfigure.SpringBootApplication;

@SpringBootApplication
public class Application {

    public static void main(String[] args) {
        SpringApplication.run(Application.class, args);
    }
}
The
@SpringBootApplication enables auto-configuration and component scanning.$ mvn spring-boot:run
We run the application and locate to the
localhost:8080/myapp address.
In this tutorial, we have covered a few basic Spring Boot annotations.
Tuesday, December 17, 2019
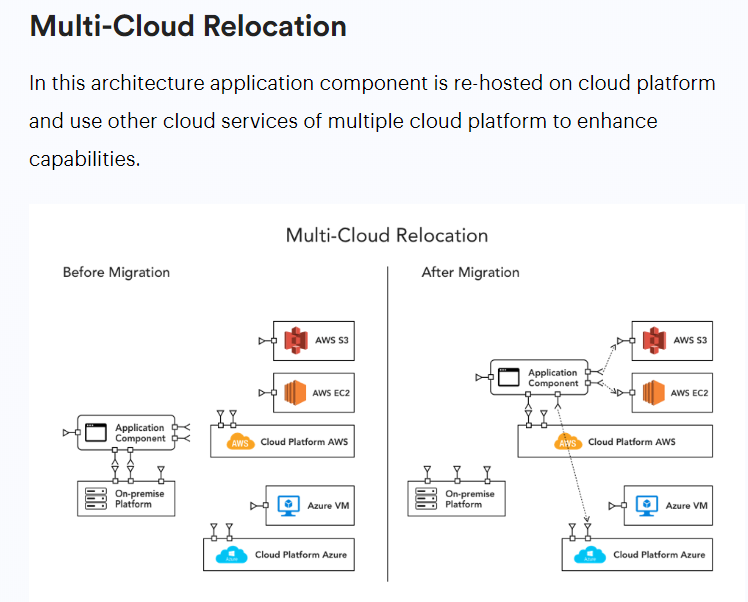
Multi Cloud
Multi-cloud strategy is the concomitant use of two or more cloud services such as AWS, Azure, Google Cloud and more.
Multi-cloud strategy is particularly effective if enterprises dealing with below challenges:
- Users are not located near any data center, or widely distributed geographically.
- Facing regulations limit in particular countries for storing data, e.g., EU.
- Environment where public clouds are used with on-premises resources.
- Cloud-based application is not resilient which can affect disaster recovery when loss of a single data center.
- Cloudification
- Multi Cloud Relocation
- Multi Cloud Refactoring
- Multi Cloud Re-Binding
- Multi- Application Modernization
- Hybrid Cud


Leadership Principles
- Be the type of leader that lifts and empower others
- Change Hurts!! It makes people insecure, confused and angry. People want things to be the same way as they've been always because that makes life easier. But if you're leader, you can't let your people hang on to the past.
Azure!!
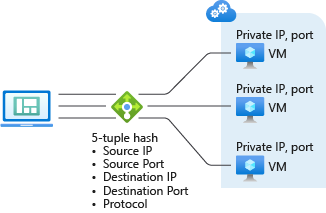
Azure Load Balancer
- Load-balance incoming internet traffic to your VMs. This configuration is known as a public load balancer.
- Load-balance traffic across VMs inside a virtual network. You can also reach a load balancer front end from an on-premises network in a hybrid scenario. Both scenarios use a configuration that is known as an internal load balancer.
- Port forward traffic to a specific port on specific VMs with inbound network address translation (NAT) rules.
- Provide outbound connectivity for VMs inside your virtual network by using a public load balancer.
Traffic Manager
Let’s say you want to balance load between two endpoint where your first endpoint is in Azure and 2nd endpoint is in on-prem . In this scinario we can use Traffic Manager . Traffic Manager allows you to control the distribution of user traffic for service endpoints in different datacenters. Service endpoints supported by Traffic Manager include Azure VMs, Web Apps, and cloud services. You can also use Traffic Manager with external, non-Azure endpoints.
When using a vanity domain with Azure Traffic Manager, you must use a CNAME to point your vanity domain name to your Traffic Manager domain name. DNS standards do not allow you to create a CNAME at the ‘apex’ (or root) of a domain. Thus you cannot create a CNAME for ‘contoso.com’ (sometimes called a ‘naked’ domain). You can only create a CNAME for a domain under ‘contoso.com’, such as ‘www.contoso.com’. To work around this limitation, we recommend using a simple HTTP redirect to direct requests for ‘contoso.com’ to an alternative name such as ‘www.contoso.com’.

Routing Method :
- Priority: Select Priority when you want to use a primary service endpoint for all traffic, and provide backups in case the primary or the backup endpoints are unavailable.
- Weighted: Select Weighted when you want to distribute traffic across a set of endpoints, either evenly or according to weights, which you define.
- Performance: Select Performance when you have endpoints in different geographic locations and you want end users to use the “closest” endpoint in terms of the lowest network latency.
- Geographic: Select Geographic so that users are directed to specific endpoints (Azure, External, or Nested) based on which geographic location their DNS query originates from. This empowers Traffic Manager customers to enable scenarios where knowing a user’s geographic region and routing them based on that is important. Examples include complying with data sovereignty mandates, localization of content & user experience and measuring traffic from different regions.
Application Gateway
Azure Application Gateway is a web traffic load balancer that enables you to manage traffic to your web applications.
Traditional load balancers operate at the transport layer (OSI layer 4 – TCP and UDP) and route traffic based on source IP address and port, to a destination IP address and port. But with the Application Gateway you can be even more specific. For example, you can route traffic based on the incoming URL. So if
/images is in the incoming URL, you can route traffic to a specific set of servers (known as a pool) configured for images. If /video is in the URL, that traffic is routed to another pool optimized for videos.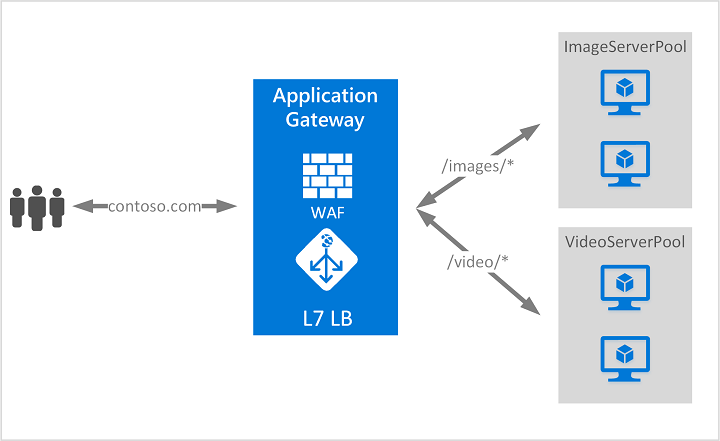
Deploy R Models to Azure
Tools
- R Studio
- VSTS
Approach-1
Take the Model and put in Docker Container
and create Keburnetes Cluster and copy images to the cluster
- Create Docker Image
- Deploy Image to Service
- These two steps can be done by Right click in VSTS and Deploy the Model to Service
Model file and Scoring File
Approach-2
- Use YMAL file config to specify the dependencies and stuff
- Create Tags and Finish.. lower left corner you can see its being deployed..
How the scoring file looks like?
- uses tensor flow model or some other model.
- load that up
- find the nodes and graphs that are relevant
- init function and run function()
- Custom code to pre-process data and normalize logic.
- azureml-defaults to keep track of model
Where are these Azure containers and Services living?
- Create AZURE ML work-space.
- It automatically create blob storage account, azure container registry been created
- Put the Docket image is put in registry
Approach-3
- Create VM , VNET, Provide IP address Public or Private (Direct Connect/ Express Route)
- Install Dependencies libraries
High Level Steps in all approaches
- Develop Code in R studio along with Data Sets
- Create R Packages
- Create Zip File
- Create Wrapper File (again ZIP)
- Upload the wrapper file to Azure ML Work Space.
Highlights
- 30% of Data Scientists are using R Data as Primary Data Analysis Tool
- RStudio Server (open source) running in containers
- Rstudio Connect Cluster


Azure Logging
OMS Log Analytics and Custom Logs
Steps
- Create LOG
- Collect LOG
- Define Custom Fields
- Search the LOG
- Delimiter
- No Circle logging
- ASCII or UTF-8
Azure PORTAL
General
- Search for Log Analytics or Monitor
- Create New Log Analytics
- Provide Name, Subscription, Resource Group, Location, Pricing Option etc..
- Go to Advanced Settings
- Go to Data
- Chose File from Custom Log
- Select Delimiter ( New line)
- Set Path
- Chose path for every log file
- Add Name and Description
- Takes 15 minutes to create the stream
- Go to Log Search...... select the custom log that is created
Azure Monitor
Wednesday, November 13, 2019
Angular Minimal options
>> ng new --minimal --routing --style=scss my-site
>> styles.scss
>> routing.ts
Angular App Tour ( foundations)
-----------------------------------------
1) Modules >> organize the code
@Declarations
@imports
@providers
@bootstrap
2) Components
>>>> ng serve will start the Node server locally in 4200 port
>>> Angular CLI re-complies anytime file is saved
Component contains
selecctor:
template:
styles:
3) Routes
const routes: Routes = [
{
path: ' ',
component: HomeComponenet
},
]
Sunday, October 20, 2019
Monday, October 7, 2019
Docker and Windows 10
- https://hub.docker.com/editions/community/docker-ce-desktop-windows
- Click on Get Docket button to download Docker
- Docker for Windows Installer.exe will be downloaded
- Docker Tool box needed for other than windows 10 Professional and Enterprise.
- https://docs.docker.com/toolbox/toolbox_install_windows/
- C:\Program Files\Docker Toolbox
- Docker cli client for running docker engine to create images,containers
- Docker machine so we can run docker commands
- Docker compose to run docker --compose command
- Kitematic --> docker gui
- Docker quick start
- Oracle VM Virtual box
- It creates Desktop icon for Docket Quick Start terminal
- Launch it
- run docker --version
- Docker version 18.03.0-ce, build 0520e24
- Docker cli client for running docker engine to create images,containers
- Docker machine so we can run docker commands
- Docker compose to run docker --compose command
- Kitematic --> docker gui
- Docker quick start
- Oracle VM Virtual box
Coding Tips
1) https://medium.com/swlh/moving-from-java-spring-framework-to-a-reactjs-apis-architecture-dd85787cc616
2) https://dzone.com/articles/binary-searching-in-java-without-recursion
3) https://dzone.com/articles/iteration-vs-recursion-in-java?fromrel=true
4) https://dzone.com/articles/faster-collection-iterators?fromrel=true
5) https://dzone.com/articles/servlet-dispatcher?edition=499292&utm_source=Daily%20Digest&utm_medium=email&utm_campaign=Daily%20Digest%202019-07-15
6) https://dzone.com/articles/how-not-to-get-eaten-by-technology?edition=499292&utm_source=Daily%20Digest&utm_medium=email&utm_campaign=Daily%20Digest%202019-07-15
7)

WAR Remediation Steps
- Apply Jumpstart standards to AWS Account
- Deploy CIS Benchmarks throughout AWS account
- CIS Benchmark Alerts o GuardDuty
- VPC Flow Logs
- CloudTrail
- CloudWatch Logs
- S3 Buckets collecting the logs, etc.
- Resiliency – Utilize Route 53
- Elastic Load Balancer and instances in Multi AZs.
- Monitoring - Compute resources & alerts
- Systems Manager – Patching, Cloud Watch Agent
Security
Current state from 31% to 83% CIS compliant
- SCP policies
- GuardDuty
- Centralize logs
- Config rules
- Security Hub (CIS
compliance)
Identity Access Management
- Clean up unnecessary IAM
users and roles
Logging and Monitoring
- Install SSM Agent in
the front-end instances to easily manage, patch, and run commands to
multiples instances via AWS Systems Manager.
- Installed CloudWatch
agent in the front-end instances and sending the application logs to
Cloudwatch
- Configured CloudWatch Alerts and SNS Topic
- Monitoring the health of the front-end instances
Reliability
- Help to define a plan
for DR (disaster recovery) (RPO and RTO)
- Potentially deploy AWS
Backups to centrally manage and automate backups across AWS services
- Provide a Network
topology diagram
Cost Optimization
- Use Reserved Instances
for baseline workloads and capacity reservation
Use On-Demand Instances for short-term or unpredictable
workloads
AWS - System Manager Setup (Apache LOGS)
Launch EC2 instance as ROOT
Edit the /etc/awslogs/awslogs.conf file and add the following.
Edit the /etc/awslogs/awslogs.conf file and add the following.
- sudo yum update -y
- sudo yum install -y awslogs
- vim /etc/awslogs/awscli.conf
- sudo service awslogs start
- sudo chkconfig awslogs on
vim /etc/awslogs/awslogs.conf
[/var/log/httpd/error_log]
datetime_format = %b %d %H:%M:%S
file = /var/log/httpd/error_log
buffer_duration = 5000
log_stream_name = {instance_id}
initial_position = start_of_file
log_group_name =
/var/log/httpd/error_log
[/var/log/httpd/access_log]
datetime_format = %b %d %H:%M:%S
file = /var/log/httpd/access_log
buffer_duration = 5000
log_stream_name = {instance_id}
initial_position = start_of_file
log_group_name =
/var/log/httpd/access_log
[/var/log/httpd/ssl_access_log]
datetime_format = %b %d %H:%M:%S
file =
/var/log/httpd/ssl_access_log
buffer_duration = 5000
log_stream_name = {instance_id}
initial_position = start_of_file
log_group_name =
/var/log/httpd/ssl_access_log
- Restart the awslogsd
service
service awslogsd restart
Subscribe to:
Comments (Atom)